  Dear Reader, Last winter, I decided to master risotto. It’s a bit tricky when you have paws, but I managed it (plus the mistakes were still delicious)! Fear not—it’s not as complicated as it seems, and as an added bonus, you don’t even have to peel the Jerusalem artichokes. This recipe is sure to impress your guests, and it’s a great way to try out this healthy tuber from our Fort Wayne CSA. If you are extra hungry, make like Gordon Ramsey and add scallops. If you are looking to keep it vegetarian, mushrooms are a great option. I’ll take it all! Love, Ginger the Hungry Dog INGREDIENTS HDF Ingredients
Other Ingredients
HOW TO MAKE Step 1: Celeriac Risotto
Step 2: Hazelnut Sunchoke Topping
0 Comments
I like to get a cover crop of winter rye sown before October so it is established for early spring growth. Rye is an amazing crop that stays green all winter and will grow six to eight feet tall by early June. At that point, I can crimp it (basically run it over with a giant wheel behind the tractor) to terminate the crop, leaving a thick mulch to fertilize crops for our fall Fort Wayne farm share. A year of rye:
This system has many benefits that facilitates healthier soil and better crops:
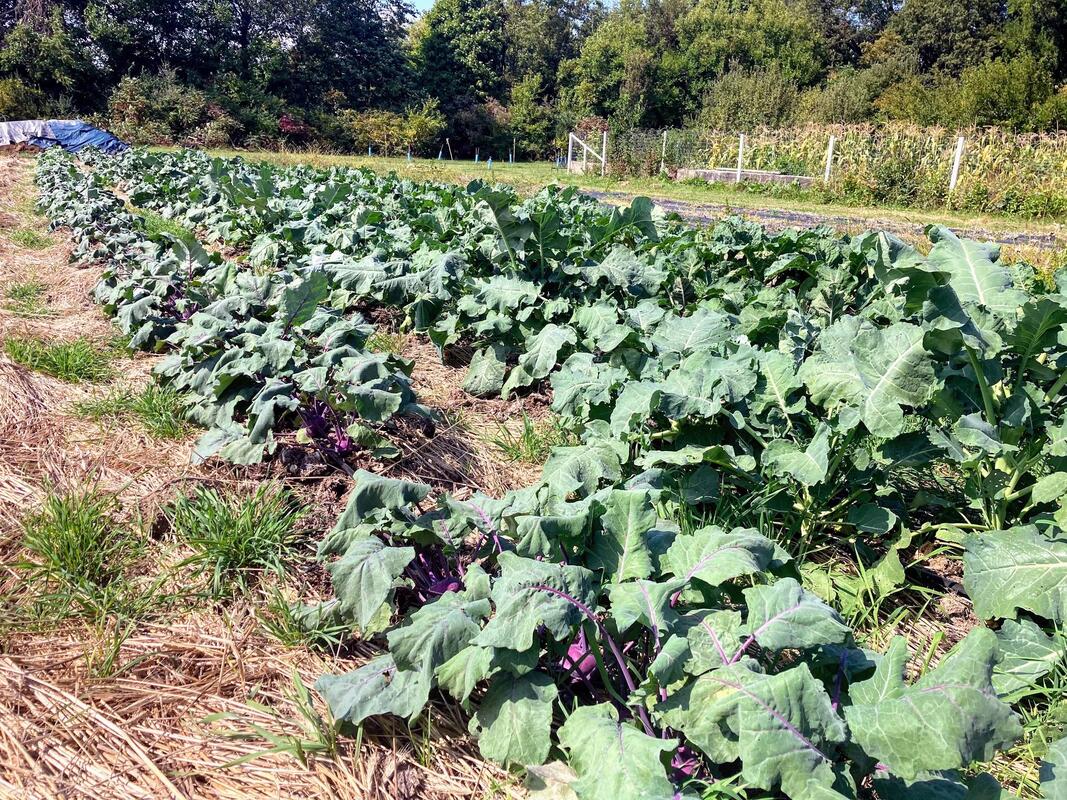 This last photo is of our main fall crop, which I planted into crimped rye. I’ve experimented with planting broccoli, cauliflower, cabbage, kohlrabi, and winter squash (not pictured) in this way for our Fort Wayne farm stand. You can see the above crops have thrived in the rye, benefiting from the covered soil and weed-free beds. The patches of green that are actually rye that has self-seeded, an indication that I was a little late on crimping, but the new rye hasn’t out-competed the crop. Our Fort Wayne farm will continue to benefit from this system for years to come.
 Peppers are one of my favorite snacks in the field and one of my favorite vegetables to cook with. Also, they are simply beautiful! Peppers are also one of the easiest foods to save for winter. If you ever have some veggies piling up in your fridge from your Fort Wayne farm share, I suggest trying some preservation. You will thank me in January!  Freeze
Two of the easiest peppers to freeze include bell peppers, which are best cut into strips. Banana peppers also work well because you can cut them into rings, and they have a nice thick wall that holds up in the freezer. Simply slice into strips or dice into chunks, place in a zip lock bag, and freeze. It's that simple! We use them all winter in soups, chili, curries, fajitas, omelets, and other dishes. Quick Pickle Finally, all peppers are easy to pickle, but banana peppers (sweet and hot) and serranos are the most commonly used. Here is a nice guide to pickling them! We will also be putting up a quick pickle recipe in our recipes section that can be used for a variety of veggies, including peppers. 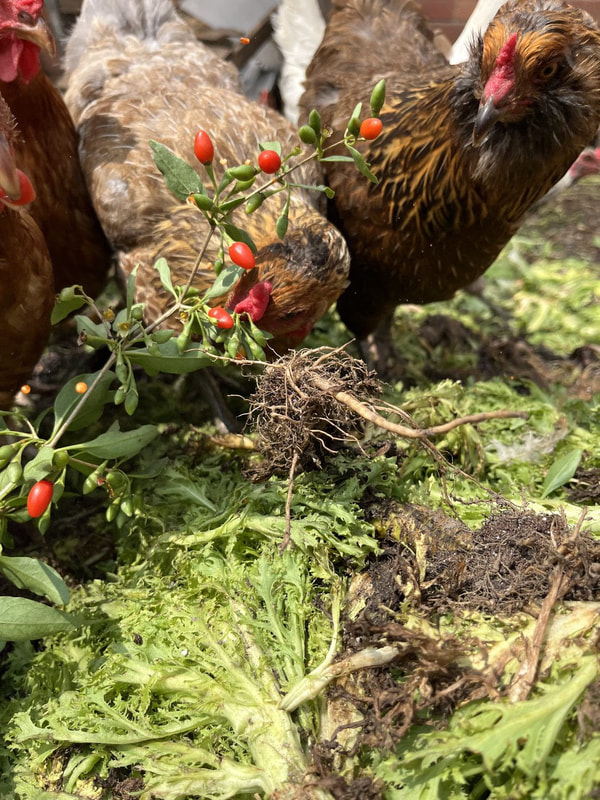 Our chickens don’t often make it into the vegetable portion of our Fort Wayne CSA newsletter, but they do more than just lay eggs. In fact, they are an integral part of our soil fertility program, as they are efficient compost makers. Get ready for a good breakdown of chicken composting! All our vegetable and kitchen scraps go to the chickens. They are omnivores, so they eat a bit of everything, though favorites include lettuces, cheese, bread, tomatoes, zucchini, and earthworms. We mix in loads and loads of woodchips to provide carbon and neutralize the smell. For you backyard compost nerds, chicken manure is high in nitrogen, which makes a very “hot” compost. You really cannot overdo it when it comes to woodchips or any similar brown material. It is not uncommon for our piles to reach 160°, which is on the upper end of becoming too hot. The compost pile provide great interest for the birds, who dig for worms and other bugs as well as sprouted seeds. Each day during the growing season, we add some sort of green material to the pile: split tomatoes, bolted lettuce, or weeds. What the chickens don’t eat, they scratch into the woodchip pile. I heap the pile, back up and the cycle repeats itself for a couple of weeks. In the photos below, you can see how big the heaps can get—generally 3-4 feet off of the ground and several feet wide. When the woodchips start to break down, I allow the pile to “mellow,” meaning I pile it up one last time and throw a tarp over it to keep moisture in and chickens out. This allows earthworms, fungi, and other microbes to break down the remaining material over the course of several months. This period is crucial to building a legion of soil life in each handful of compost.
When the pile is done, it is roughly half its original size. It's dark brown, has no odor, and is teeming with worms. This is when its ready to be added onto our garden beds. Because our compost is made with chicken manure, it is extremely fertile, so a little goes a long way to help us grow all the veggies for our Fort Wayne farm CSA! Thank you, chickens! |
Archives
June 2024
Categories |

 RSS Feed