 This is a a deep dive into one of or staple crops that transports us to a time of cold fingers, long winter shadows, and freezing water lines. Onions have been tricky for us in the past. They are one of the more labor-intensive crops to transplant and are susceptible to a myriad of diseases. They enjoy a long, cool spring to grow their green tops followed by a hot and dry summer to size up their bulbs. If you have been following Indiana springs over the last several years, you know that “cooler” springs are increasingly rare, and our humid summers facilitate a lot of disease pressure. In order to get an earlier crop and to avoid the weather issues, we have taken to a new schedule. Since 2022, we’ve planted onions in the late fall, overwintered them in an unheated greenhouse, and harvested them in June just in time for our first Fort Wayne CSA pickup.  While all onions are extremely hardy in cold weather (they can survive outside uncovered just fine), they are especially sensitive to daylight hours. This means they “bolt,” or flower and set seed, after the winter solstice. Therefore, it’s the lengthening days, not the cold, that’s a concern for overwintering onions. Luckily, these onions have been selected to withstand bolting and have been reliable for us going on three years now.
We start the onions from seed in early September and plant them in late October after the first frost and following tomatoes. They are essentially dormant all winter, growing only after Valentine’s Day, when we get over 10.5 daylight hours. The warmer temperatures in March and April bring rapid growth to the tops, while the bulbs begin to grow in May. By early June, the leaves have flopped over, indicating that they are ready to harvest for our Fort Wayne farm share. Note that we grow our onions in clusters, which saves time planting; the bulbs simply push away from each other as they grow under the weed mat. Bonus points if you recognize the tall plants in the background of this photo. That will be a topic for another time.
0 Comments
 We’ve added wood chips to all the walkways on our Fort Wayne farm, which required a lot of manual labor. However, we know this will pay off in the years to come. Wood chips have so many benefits. They reduce soil compaction, reduce wedding, keep the soil moist, and provide food for insects and mycelia (mushroom “roots"). As an added bonus, the wood chips decompose into compost in a year or two. This can be shoveled onto the vegetable beds to help all your Fort Wayne CSA goodies grow! Wood chips also mark the growing beds, which is integral as we move to a no-till system with permanent growing beds. In traditional row crop farming, the entire field is mechanically plowed and tilled to remake the beds each year. However, there are a lot of benefits to permanent beds:
 In the photo above, the broccoli and cabbage were planted into straw mulch, which was left over from the previous garlic crop. These were planted just days after the garlic was harvested (I added a bit of added compost from our chickens). The year after, there was some remaining straw mulch, and I planted potatoes into this in the early spring. That's three crops with just one mulch application on our Fort Wayne farm!
From July through the first frost, we have a lot of peppers in all sizes and colors at our Fort Wayne farm stand. Some of them, like bell peppers, you'll recognize. However, we often get questions about how to best use the more unusual varieties, so we created some blog posts! This one goes over some of the less common sweet peppers.
Our offerings do vary from year to year, so be sure to stop by our Fort Wayne farm stand to see what we've got! Peppers usually start going crazy around July and last until the weather turns.
We grow a wide variety of hot and mild peppers for your culinary needs for our Fort Wayne CSA. Here, we've listed our hot peppers from hottest to mildest. Hot peppers are easy to preserve whole as pickled or dried peppers, or you can make pepper powder or hot sauce. I have provided my favorite use for each variety below.
When designing the initial layout for our biodiverse Fort Wayne farm, I knew I wanted to incorporate several hedgerows into the design. Hedgerows are essentially perennial beds spaced every 100 feet that incorporate dozens—if not hundreds—of herbs, flowers, fruits, and trees. Hedgerows are designed to flower most of the growing season. Their occupants span from a fifteen-foot pear tree to creeping thyme (a six-inch ground cover).
Hedgerows accomplish three main goals for our Fort Wayne farm:
   Dear Reader, We’ve been getting a lot of questions about Tokyo Bekana lately. This Japanese cabbage is a little thinner than normal cabbage—it sort of resembles Bok Choy or napa cabbage and can easily substitute for those in recipes. It can be eaten raw or cooked and has a nice, light flavor. Personally, I prefer my greens cooked into a hearty meal or doused in bacon grease. This recipe doesn’t do that, but I would absolutely still eat it. It features raw Tokyo Bekana and its crunchy cousin, kohlrabi, in a slaw made with miso, soy sauce, and rice wine vinegar—three classic Japanese flavors. Add other veggies from our Fort Wayne farm stand, like green onion or julienned turnips or radishes, to give this slaw an extra crunch. Love, Ginger the Hungry Dog Tokyo Bekana and Kohlrabi Miso Slaw
HDF Ingredients:
Non-HDF Ingredients
How to Make
 Dahlias do not survive over the winter in our Midwestern climate. When lows in the mid-teens come, we work hard to dig and divide the dahlia tubers on our Fort Wayne farm. Dahlias grow into large clumps of tubers below ground, which can be divided and replanted each year. With a bit of care and proper storage, we can propagate dozens of new plants off a single cluster! Each cluster is cleaned, cut in half, and divided into smaller tubers for storage. It is important that each tuber has an “eye,” or growth spot, located near the stem of the main cluster. Dahlias need the energy stored from the root to make it through the winter storage, but they will not sprout without an eye.  Divided tubers with eyes end up looking like small potatoes or even weird, gnarly fingers. It's because of the eyes that the tubers have these long, delicate necks as pictured on the right above. Once the tubers are cleaned and free from any debris that may cause rot, we wrap them in plastic to ensure they do not dry out in winter storage. The wrapped tubers are stored in our walk-in cooler at around 38-40 degrees - just cold enough to prevent premature growth, but not so cold that they might freeze. Thanks to these funny-looking tubers, we will have plenty of Fort Wayne dahlias for next year! Obligatory side note: dahlia tubers are actually perfectly edible, but with so many other veggies on hand, we prefer to keep them for flowers!
Finished and ready for winter storage. Each tuber will eventually grow into the massive clumps pictured previously.
  Dear Reader, Last winter, I decided to master risotto. It’s a bit tricky when you have paws, but I managed it (plus the mistakes were still delicious)! Fear not—it’s not as complicated as it seems, and as an added bonus, you don’t even have to peel the Jerusalem artichokes. This recipe is sure to impress your guests, and it’s a great way to try out this healthy tuber from our Fort Wayne CSA. If you are extra hungry, make like Gordon Ramsey and add scallops. If you are looking to keep it vegetarian, mushrooms are a great option. I’ll take it all! Love, Ginger the Hungry Dog INGREDIENTS HDF Ingredients
Other Ingredients
HOW TO MAKE Step 1: Celeriac Risotto
Step 2: Hazelnut Sunchoke Topping
I like to get a cover crop of winter rye sown before October so it is established for early spring growth. Rye is an amazing crop that stays green all winter and will grow six to eight feet tall by early June. At that point, I can crimp it (basically run it over with a giant wheel behind the tractor) to terminate the crop, leaving a thick mulch to fertilize crops for our fall Fort Wayne farm share. A year of rye:
This system has many benefits that facilitates healthier soil and better crops:
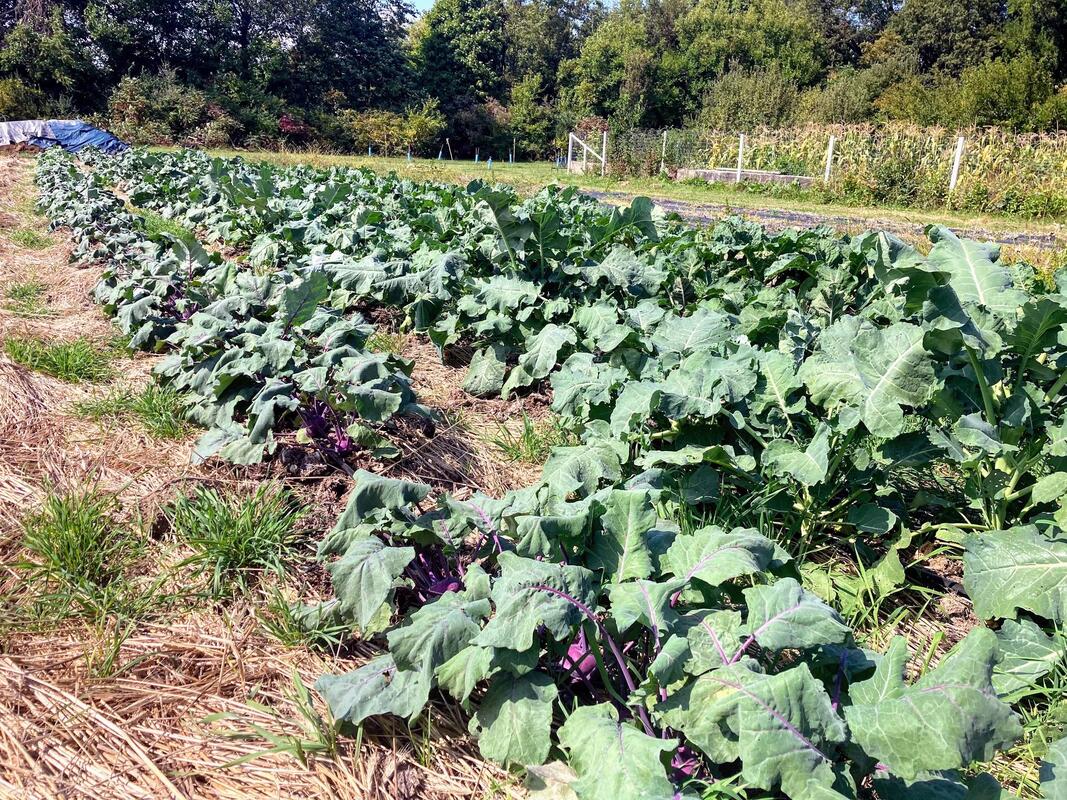 This last photo is of our main fall crop, which I planted into crimped rye. I’ve experimented with planting broccoli, cauliflower, cabbage, kohlrabi, and winter squash (not pictured) in this way for our Fort Wayne farm stand. You can see the above crops have thrived in the rye, benefiting from the covered soil and weed-free beds. The patches of green that are actually rye that has self-seeded, an indication that I was a little late on crimping, but the new rye hasn’t out-competed the crop. Our Fort Wayne farm will continue to benefit from this system for years to come.
 Peppers are one of my favorite snacks in the field and one of my favorite vegetables to cook with. Also, they are simply beautiful! Peppers are also one of the easiest foods to save for winter. If you ever have some veggies piling up in your fridge from your Fort Wayne farm share, I suggest trying some preservation. You will thank me in January!  Freeze
Two of the easiest peppers to freeze include bell peppers, which are best cut into strips. Banana peppers also work well because you can cut them into rings, and they have a nice thick wall that holds up in the freezer. Simply slice into strips or dice into chunks, place in a zip lock bag, and freeze. It's that simple! We use them all winter in soups, chili, curries, fajitas, omelets, and other dishes. Quick Pickle Finally, all peppers are easy to pickle, but banana peppers (sweet and hot) and serranos are the most commonly used. Here is a nice guide to pickling them! We will also be putting up a quick pickle recipe in our recipes section that can be used for a variety of veggies, including peppers. |
Archives
June 2024
Categories |


 RSS Feed